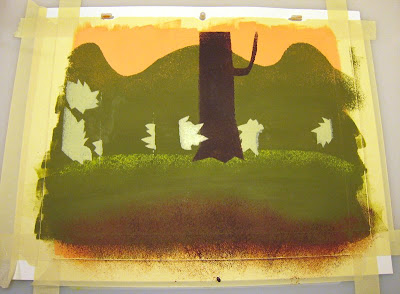
Here are the pics from the BG study I did, in case you're interested. Please refer to the post below for more accurate colors.
1. Taped down the bg paper (in this case, 2 ply bristol).
2. I brushed on the flat salmon color. In the future I'd use a roller to get it nice and even. You can also see the first mask I cut out of the animation cel (I pre-cut all of them from the printed out image). The cels came in handy with their registration holes. I did a trial run, so that's the sponging you see.
3. Sponging applied and cel removed. You can see how the paper is buckling (this leveled out later).
4. Sponging detail.
5. Two more layers of sponging applied. The light green has been masked off with another cel.
6. Dark brown sponging over the red brown.
7. While sponging on the bushes, the sponge and paint were too wet, which caused a little sloppiness. After this point, I made sure not to make the same mistake.
8. Here's a shot of the cel with shapes cut out and paint sponged on. The crazy reflection is from a funky shaped pendant lamp.
9. Cel removed to show the result.
10. Close-up of green detail lines being added (with a #3 round sable).
11. Tree details sponged in.
12. Bush details added and tree trunk painted in.
13. First layer of dark sponging and details are added to the trunk.
14. Light blue details and sponging added.
15. Dark details added again to complete the stump.
16. Tape removed! Added the last couple details before scanning (see post below).
Hope showing these steps has helped someone learn... something! I know I did. A lot more work goes into these "simple" style paintings than it may seem at first glance.
May 29, 2008
Art Lozzi BG Study Process
Posted by
Drake Brodahl (pumml)
at
Thursday, May 29, 2008
![]()
![]()
Labels: Art Lozzi, Backgrounds, painting, Study
Subscribe to:
Post Comments (Atom)


16 comments:
Great Tutorial! I am heafing to the paint store to stock up on supplies.
I will never be that great though.
DanishIce
nice drake! I gotta try this stuff out soon. It turned out almost spot-on!
Always cool to see how other people work! THanks for sharing.
I'm so thankful you put these up. I actually use masking tape to do my sponging, and then I end up with a torn up piece of watercolor paper.
You really nailed this, amazing
Thank you for the comments, ladies! Glad you found it useful.
Thanks for showing the process! Its definitely gives a great insight into how these backgrounds are created from scratch.
This is a great insight into your process. Just found your blog and will certainly return, fantastic and inspirational. Cheers.
I recently started learning this lost art, it's nice to see other people's work and tips, thanks!
This is fantastic - very useful and interesting for someone wanting to learn how to do bgs (ie. me)
Thanks for posting this!
They used to paint like this, only better, in the Altamira caves 17.000 years ago.
Very nice stuff! So much fun to paint.
Sponging makes for such great texture in a bg...
Did a lot of this kind of stuff at my first animation job, long ago.
We used big rolls of 3-ply bristol from cartoon color, cut to the right size for the shot, and then pre-soaked and dried to avoid the buckling effect.
Love the doodles, too!
Thanks, all! And thanks for the tips, Andrew. I agree, I love how much sponging can add to a painting.
What a great technique! Thank a lot for this!
Wow! Thanks for sharing!! I always wondered how they do this effect. It's that done with any sponge or there is a special one?
Awesomely Awesome Tutorial!!!
Just discovered your blog. Like your work. Thanks for the tutorial. Inspires me to try a new technique!
Post a Comment